在CentOS7上配置LNMP环境:Nginx篇
2017-04-05
早就听说AWS的大名了,信用卡办下来后第一件事就是申请了个AWS的账号,买了美东的EC2(CentOS7)及RDS(MySQL5.6)资源各一。当然都是免费套餐中的,不管怎样总算是终于有了自己的主机了。
因为之前使用的GitHub Pages博客一直都是静态的Html,所以这次打算直接丢到EC2上先用nginx跑起来,然后将国外线路解析到这台EC2上,国内线路用 七牛的CDN 的,相册中的照片也是存贮在七牛的。
安装Nginx
1、安装Nginx依赖及常用软件包
1 [root@opstrip opt]# yum -y install net-tools git gcc rsync lrzsz telnet wget ntp dstat mlocate bind-utils nscd psmisc python-devel python-pip mtr chrony gcc gcc-c++ autoconf automake zlib zlib-devel openssl openssl-devel pcre-devel
2、安装前的准备
1
2
3
4
5
6
7
# 创建Nginx运行用户 [root@opstrip opt]# groupadd -r www [root@opstrip opt]# useradd -s /sbin/nologin -g www -r www # 获取Nginx源码并解压 [root@opstrip opt]# wget http://nginx.org/download/nginx-1.11.12.tar.gz [root@opstrip opt]# tar xf nginx-1.11.12.tar.gz [root@opstrip opt]# cd nginx-1.11.12
3、编译安装Nginx
1
2
3
4
5
6
7
8
9
10
11
12
13
14
15
16
17
18
19
20
21
22
23
24
25
26
27
28
29
30
31
32
33
34
35
36
# 编译Nginx [root@opstrip nginx-1.11.12]# ./configure \ --prefix=/etc/nginx \ --sbin-path=/usr/sbin/nginx \ --conf-path=/etc/nginx/nginx.conf \ --error-log-path=/var/log/nginx/error.log \ --http-log-path=/var/log/nginx/access.log \ --pid-path=/var/run/nginx.pid \ --lock-path=/var/run/nginx.lock \ --http-client-body-temp-path=/var/cache/nginx/client_temp \ --http-proxy-temp-path=/var/cache/nginx/proxy_temp \ --http-fastcgi-temp-path=/var/cache/nginx/fastcgi_temp \ --http-uwsgi-temp-path=/var/cache/nginx/uwsgi_temp \ --http-scgi-temp-path=/var/cache/nginx/scgi_temp \ --user=www \ --group=www \ --with-http_ssl_module \ --with-http_realip_module \ --with-http_addition_module \ --with-http_sub_module \ --with-http_dav_module \ --with-http_flv_module \ --with-http_mp4_module \ --with-http_gunzip_module \ --with-http_gzip_static_module \ --with-http_random_index_module \ --with-http_secure_link_module \ --with-http_stub_status_module \ --with-http_auth_request_module \ --with-mail_ssl_module \ --with-file-aio \ --with-cc-opt='-O2 -g -pipe -Wp,-D_FORTIFY_SOURCE=2 -fexceptions -fstack-protector --param=ssp-buffer-size=4 -m64 -mtune=generic' # 安装Nginx [root@opstrip nginx-1.11.12]# make && make install # 查看Nginx版本以确认Nginx安装成功 [root@opstrip nginx-1.11.12]# nginx -V
4、配置Nginx服务并启动
1
2
3
4
5
6
7
8
9
10
11
12
13
14
15
16
17
18
19
20
21
22
23
24
25
26
27
28
29
# 创建Nginx缓存目录并赋予相应权限 [root@opstrip nginx-1.11.12]# mkdir -p /var/cache/nginx/{client_temp,proxy_temp,fastcgi_temp,uwsgi_temp,scgi_temp} [root@opstrip nginx-1.11.12]# chown -R www.www /var/cache/nginx/ # 将Nginx添加到systemd中 [root@opstrip nginx-1.11.12]# vi /usr/lib/systemd/system/nginx.service [Unit] Description=nginx - high performance web server Documentation=http://nginx.org/en/docs/ After=network.target remote-fs.target nss-lookup.target [Service] Type=forking PIDFile=/var/run/nginx.pid ExecStartPre=/usr/sbin/nginx -t -c /etc/nginx/nginx.conf ExecStart=/usr/sbin/nginx -c /etc/nginx/nginx.conf ExecReload=/bin/kill -s HUP $MAINPID ExecStop=/bin/kill -s QUIT $MAINPID PrivateTmp=true [Install] WantedBy=multi-user.target # 设置nginx开机启动并启动 [root@opstrip opt]# systemctl enable nginx.service [root@opstrip opt]# systemctl start nginx.service # 确认nginx进程已启动 [root@opstrip opt]# ps -ef|grep nginx root 12245 1 0 4月05 ? 00:00:00 nginx: master process /usr/sbin/nginx -c /etc/nginx/nginx.conf www 19228 12245 0 15:02 ? 00:00:00 nginx: worker process root 29996 29890 0 16:58 pts/3 00:00:00 grep --color=auto nginx
这时候浏览器访问http://<EC2的公网ip>,如果安全组与firewalld、selinux配置正确的话访问的应该是nginx的默认页。
配置Nginx虚拟主机
5、Nginx虚拟主机配置
是时候放网站了。网站放置前需要把相应的域名解析到这台EC2上,或者就需要绑定本地hosts。这里是将国外线路A记录到这台EC2上,同时添加了个a.opstrip.com域名指向这台EC2。
1
2
3
4
5
6
7
8
9
10
11
12
13
14
15
16
17
18
19
20
21
22
23
24
25
26
27
28
29
30
31
32
33
34
35
36
37
38
39
40
41
42
43
44
45
46
47
48
49
50
51
52
53
54
55
56
57
58
59
60
61
62
63
64
65
66
67
68
69
70
71
72
73
74
75
76
77
78
79
80
81
82
83
84
85
86
87
88
89
90
91
92
93
94
95
96
97
98
99
100
101
102
103
104
105
106
107
108
109
110
111
112
113
114
115
116
117
118
119
120
121
122
123
124
125
126
127
128
129
130
131
132
133
134
135
136
137
138
139
140
141
142
143
144
145
146
147
148
149
150
151
152
153
154
155
156
157
158
159
160
161
162
163
164
165
166
167
168
169
[root@opstrip opt]# git clone https://github.com/opstrip/opstrip.github.io.git # 克隆GitHub Pages博客中的Html源码 [root@opstrip opt]# ln -s /opt/opstrip.github.io /usr/share/html [root@opstrip opt]# mkdir -p /etc/nginx/conf.d # 将Nginx虚拟机配置文件放入到此目录 [root@opstrip opt]# vi /etc/nginx/nginx.conf # Nginx主配置文件 user www; worker_processes 1; error_log /var/log/nginx/error.log; error_log /var/log/nginx/error.log notice; error_log /var/log/nginx/error.log info; pid /var/run/nginx.pid; events { use epoll; worker_connections 51200; multi_accept on; } http { include mime.types; default_type application/octet-stream; #log format log_format main '$remote_addr - $remote_user [$time_local] "$request" ' '$status $body_bytes_sent "$http_referer" ' '"$http_user_agent" $http_x_forwarded_for'; access_log /var/log/nginx/access.log main; server_names_hash_bucket_size 128; client_header_buffer_size 32k; large_client_header_buffers 4 32k; client_max_body_size 50m; sendfile on; tcp_nopush on; keepalive_timeout 60; tcp_nodelay on; # fastcgi_connect_timeout 300; # fastcgi_send_timeout 300; # fastcgi_read_timeout 300; # fastcgi_buffer_size 64k; # fastcgi_buffers 4 64k; # fastcgi_busy_buffers_size 128k; # fastcgi_temp_file_write_size 256k; gzip on; gzip_min_length 1k; gzip_buffers 4 16k; gzip_http_version 1.0; gzip_comp_level 2; gzip_types text/plain application/x-javascript text/css application/xml; gzip_vary on; gzip_proxied expired no-cache no-store private auth; gzip_disable "MSIE [1-6]\."; #limit_conn_zone $binary_remote_addr zone=perip:10m; ##If enable limit_conn_zone,add "limit_conn perip 10;" to server section. server_tokens off; #server { #listen 80; #server_name localhost; #charset koi8-r; #access_log logs/host.access.log main; #location / { #root html; #index index.html index.htm; #} #error_page 404 /404.html; # redirect server error pages to the static page /50x.html # #error_page 500 502 503 504 /50x.html; #location = /50x.html { #root html; #} # proxy the PHP scripts to Apache listening on 127.0.0.1:80 # #location ~ \.php$ { # proxy_pass http://127.0.0.1; #} # pass the PHP scripts to FastCGI server listening on 127.0.0.1:9000 # #location ~ \.php$ { # root html; # fastcgi_pass 127.0.0.1:9000; # fastcgi_index index.php; # fastcgi_param SCRIPT_FILENAME /scripts$fastcgi_script_name; # include fastcgi_params; #} # deny access to .htaccess files, if Apache's document root # concurs with nginx's one # #location ~ /\.ht { # deny all; #} #} # another virtual host using mix of IP-, name-, and port-based configuration #server { # listen 8000; # listen somename:8080; # server_name somename alias another.alias; # location / { # root html; # index index.html index.htm; # } #} # HTTPS server #server { # listen 443 ssl; # server_name localhost; # ssl_certificate cert.pem; # ssl_certificate_key cert.key; # ssl_session_cache shared:SSL:1m; # ssl_session_timeout 5m; # ssl_ciphers HIGH:!aNULL:!MD5; # ssl_prefer_server_ciphers on; # location / { # root html; # index index.html index.htm; # } #} include conf.d/*.conf; } [root@opstrip opt]# vi /etc/nginx/conf.d/opstrip.conf server { listen 80; listen [::]:80 ssl ipv6only=on; server_name opstrip.com www.opstrip.com a.opstrip.com; #charset koi8-r; #access_log logs/host.access.log main; root /usr/share/html; index index.html index.htm README README.txt; location / { root /usr/share/html; index index.html index.htm; } error_page 404 /404.html; # redirect server error pages to the static page /50x.html error_page 500 502 503 504 /50x.html; location = /50x.html { root html; } } [root@opstrip opt]# systemctl reload nginx
本地ping下a.opstrip.com,如果DNS已经生效用浏览器打开 http://a.opstrip.com 博客就可以展现出来了。
获取并配置SSL证书
6、使用Let‘s encrypt免费证书
1
2
3
git clone https://github.com/letsencrypt/letsencrypt cd letsencrypt/ ./certbot-auto certonly --webroot --agree-tos -v -t --email shiyao.zh@gmail.com -w /usr/share/html -d opstrip.com,www.opstrip.com,a.opstrip.com
以上命令使用certbot的webroot方式获取,-w表示网站路径,-d表示域名,可以多个。遗憾的是还不支持泛域名。
1
2
3
4
5
6
7
8
9
10
11
IMPORTANT NOTES: - Congratulations! Your certificate and chain have been saved at /etc/letsencrypt/live/opstrip.com/fullchain.pem. Your cert will expire on 2017-07-04. To obtain a new or tweaked version of this certificate in the future, simply run certbot-auto again. To non-interactively renew *all* of your certificates, run "certbot-auto renew" - If you like Certbot, please consider supporting our work by: Donating to ISRG / Let's Encrypt: https://letsencrypt.org/donate Donating to EFF: https://eff.org/donate-le
每次获取的证书有效期都是90天,不过到期后可以续签的。证书文件在/etc/letsencrypt/live下,fullchain.pem与privkey.pem是nginx的公钥与私钥。所以Nginx SSL配置如下:
1
2
3
4
5
6
7
8
9
10
11
12
13
14
15
16
17
18
19
20
21
22
23
24
25
26
27
28
29
30
31
32
33
34
35
36
37
38
39
40
41
42
43
44
45
46
47
48
49
50
51
52
53
[root@opstrip opt]# vi /etc/nginx/conf.d/opstrip.conf server { listen 80; listen [::]:80 ssl ipv6only=on; server_name opstrip.com www.opstrip.com a.opstrip.com; #charset koi8-r; #access_log logs/host.access.log main; root /usr/share/html; index index.html index.htm README README.txt; location / { root /usr/share/html; index index.html index.htm; } error_page 404 /404.html; # redirect server error pages to the static page /50x.html # error_page 500 502 503 504 /50x.html; location = /50x.html { root html; } } # HTTPS server server { listen 443 ssl; listen [::]:443 ssl ipv6only=on; server_name opstrip.com www.opstrip.com a.opstrip.com; ssl on; #ssl_certificate /etc/nginx/certs/www.opstrip.com.pem; #ssl_certificate_key /etc/nginx/certs/www.opstrip.com.key; ssl_certificate /etc/letsencrypt/live/opstrip.com/fullchain.pem; ssl_certificate_key /etc/letsencrypt/live/opstrip.com/privkey.pem; ssl_session_cache shared:SSL:1m; ssl_session_timeout 5m; #ssl_ciphers HIGH:!aNULL:!MD5; #ssl_prefer_server_ciphers on; root /usr/share/html; index index.html index.htm README README.txt; location / { root /usr/share/html; index index.html index.htm; } } [root@opstrip opt]# systemctl reload nginx
现在可以访问 https://a.opstrip.com 了,如下图:
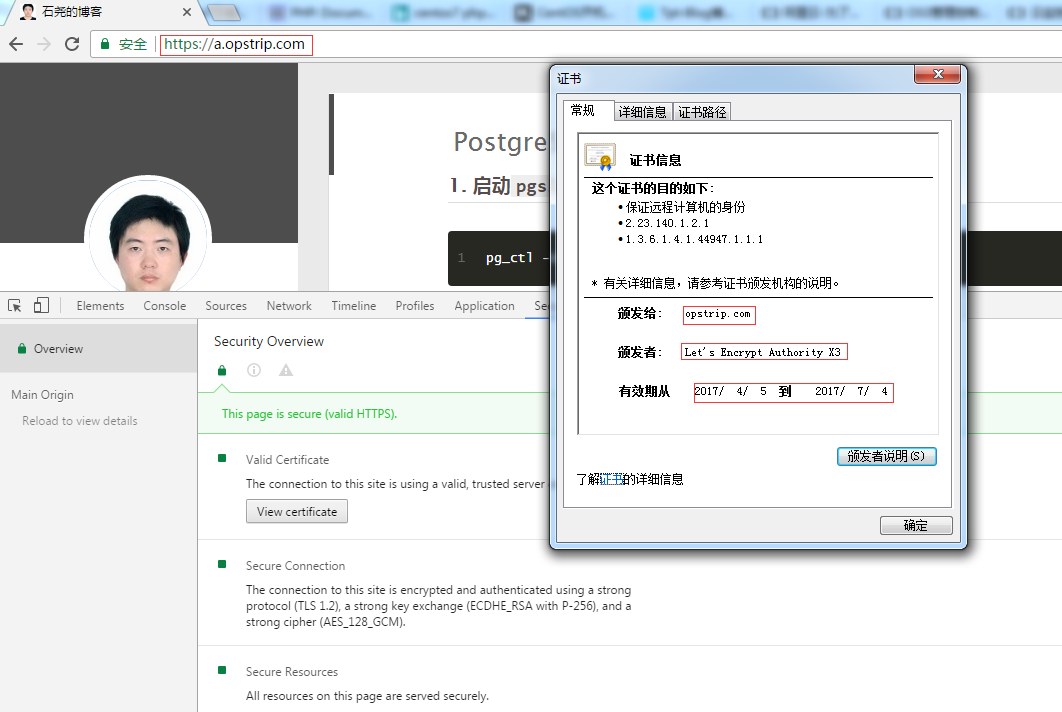
可以看到证书的颁发机构为`Let's Encrypt`,有效期`三个月`。
因此我们可以写脚本`自动续签`的,如下:
1
2
3
4
5
6
7
8
9
10
11
12
13
14
15
16
17
18
19
20
21
22
23
24
25
26
27
28
[root@opstrip ~]# vi /opt/letsencrypt/renewletsencrypt.sh #!/bin/bash . /etc/profile # /usr/bin/systemctl stop nginx cd /opt/letsencrypt ./letsencrypt-auto renew --email shiyao.zh@gmail.com --agree-tos sleep 3 /usr/bin/systemctl reload nginx exit 0 # 将脚本添加到crontab任务每3月执行一次即可 [root@opstrip ~]# vi /etc/crontab SHELL=/bin/bash PATH=/sbin:/bin:/usr/sbin:/usr/bin MAILTO=root # For details see man 4 crontabs # Example of job definition: # .---------------- minute (0 - 59) # | .------------- hour (0 - 23) # | | .---------- day of month (1 - 31) # | | | .------- month (1 - 12) OR jan,feb,mar,apr ... # | | | | .---- day of week (0 - 6) (Sunday=0 or 7) OR sun,mon,tue,wed,thu,fri,sat # | | | | | # * * * * * user-name command to be executed 59 23 30 */3 * /bin/bash /opt/letsencrypt/renewletsencrypt.sh >> /opt/letsencrypt/renewletsencrypt.out 2>&1
以上,Nginx及SSL证书自动获取讲解完成。下次将介绍PHP。